
Art Ideas
to try at home
Are you bored? Looking to get creative? Need a few minutes of mindfulness? Do you want to explore different types of art? Did our podcast leave you itching to get art-ing?!
This is your art hub, scroll through the activities below to get stuck into creating some masterpieces at home. All art activity ideas are inspired by an episode of Art Adventures with YofA. Can you guess which activity goes with which episode?

E12 Marvelous Mosaic
Materials Needed: - Blank cardstock or thick paper (black to make your design pop or any other colour) - Scrap paper, old wrapping paper, magazines, or coloured paper Scissors Glue stick or liquid glue Pencil and eraser (for sketching designs) - Fine-tip markers or pens (optional, for details) Objective: Create a mosaic artwork by cutting and arranging small pieces of scrap and wrapping paper into a unique design. This activity encourages creativity and sustainability by repurposing materials into a beautiful, textured composition. Steps: 1. Choose a Theme for Your Mosaic: Decide what image or pattern you want to create using paper mosaic pieces. Some ideas include: 🌿 A nature scene with trees, leaves, or flowers 🐠 An underwater world with fish and sea creatures 🌞 A sun and sky design with warm and cool colours 🎭 An abstract or geometric pattern with bright, bold shapes 🐦 A bird, butterfly, or animal using different shades of colour 2. Gather and Sort Your Paper Scraps: Look through old wrapping paper, magazines, or coloured paper for interesting textures and colours. Sort them into groups based on the colours you’ll need for your design. 3. Sketch Your Design (Optional): Lightly draw your design onto your cardstock with a pencil. This will act as a guide for placing your mosaic pieces. 4. Cut and Arrange Your Mosaic Pieces: Cut the paper into small squares, triangles, or irregular shapes. Begin placing the pieces on your base, arranging them to form your chosen design. Leave small gaps between the pieces to give it a classic mosaic effect, or place them close together for a fuller look. 5. Glue Everything in Place: Once you’re happy with your design, carefully glue each piece down. Press gently to ensure they stick well. 6. Add Finishing Touches: Outline or highlight parts of your design with a fine-tip marker. Use metallic or textured paper for extra depth. Add small stickers, glitter, or embellishments for extra detail. 7. Reflect on Your Artwork: Give your mosaic a title and think about how the colours and patterns work together. You can also write a short description about what inspired your piece. 8. Share Your Creation! Display your finished mosaic, give it as a handmade gift, or turn it into a decorative card or bookmark. Take a photo and send it to contact@yofa.ie—we’d love to see your creative designs!

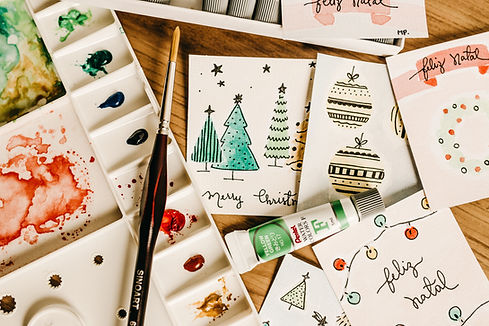
E11 Card Art
Materials Needed: - Blank greeting cards or folded cardstock (white or coloured) - Watercolour paints and brushes - A cup of water and paper towels - Fine-tip markers or pens (optional, for details) - Glitter, stickers, or embellishments (optional) - Reference images of Christmas card designs (optional, for inspiration) Objective: Create unique, hand-made Christmas cards using watercolour painting techniques. Experiment with blending colours, layering washes, and adding festive details to design beautiful and personal holiday greetings. Steps: 1. Learn About Watercolour Techniques: Watercolour paints create soft, fluid effects by layering transparent colours. Some useful techniques include: Wet-on-Wet: Apply water first, then add paint for a soft, blended look. Wet-on-Dry: Apply paint directly onto dry paper for more defined edges. Layering: Let one layer dry before adding another to build up colour and depth. Splatter Effect: Flick your brush to create a snowy or starry effect. 2. Choose a Festive Theme: Decide on a Christmas-themed design for your card. Some ideas include: 🎄 Christmas trees with layered green tones ❄️ Snowy landscapes with soft blue and white washes 🎁 Presents with bold, bright colours 🔔 Golden bells with warm highlights 🌟 Twinkling stars in a night sky 3. Plan Your Colours & Composition: Think about how your colours will blend and how your design will fit on the card. Lightly sketch outlines in pencil if needed. 4. Start Painting: Use light layers to build up your design. Experiment with different brush strokes—a dry brush for texture, a wet brush for smooth blends. Let each layer dry before adding new details to avoid smudging. 5. Add Details & Accents: Use fine-tip markers or pens to outline or add small decorations. Sprinkle a little glitter while the paint is wet for a frosty effect. Add small white paint dots or splatters for a snow-like finish. 6. Personalise Your Card: Write a heartfelt holiday message inside, like "Wishing You a Merry Christmas!" or "Warm Winter Wishes!" Add extra designs around the edges, such as holly leaves, stars, or swirls. 7. Share Your Artwork! Give your handmade card to a loved one or use it as festive décor. Take a photo and send it to contact@yofa.ie—we’d love to see your creations!

E10 Post-it Pointillism
Materials Needed: - Sticky Notes (variety of colours or plain white) - Markers or Fine-Tip Pens - Acrylic Paints and Cotton Swabs (optional) - Reference Images of Pointillism Art (optional, for inspiration) Objective: Create a series of mini pointillism artworks on sticky notes. Combine your pieces into a colourful mosaic or mural by arranging them in a creative way. Steps: 1. Learn About Pointillism: Research the art technique of pointillism, which uses tiny dots of colour to create an image. Look up artists like Georges Seurat or Paul Signac, who pioneered this style. Notice how they blended colours by placing dots close together rather than mixing the paint. 2. Choose a Theme: Pick a subject or theme for your sticky-note artworks. It could be landscapes, animals, abstract shapes, or even patterns. Alternatively, try representing something seasonal like spring flowers or winter scenes. 3. Plan Your Colours and Layout: Think about the colours you’ll use and how they will interact when arranged on your sticky notes. Decide if your sticky notes will each be individual works or part of a larger piece when put together. 4. Start Dotting: - If using markers or pens, make tiny dots by gently pressing the tip onto the sticky note. Fill your design with layers of dots in different colours to create shading or texture. - If using paints, dip a cotton swab in your chosen colour and make small dots on the sticky note. Allow one colour to dry before adding overlapping layers of another colour. 5. Experiment with Techniques: - Try spacing dots farther apart for a lighter effect or clustering them for richer, deeper colours. - Use complementary colours to make your designs pop or stick to a monochromatic palette for a calming effect. 6. Create Your Mosaic: Arrange your sticky notes on a wall, board, or table to form a mosaic. You can create a grid, a spiral, or a random scatter of colours and designs. 7. Name Your Series: Come up with a title for your sticky-note gallery. Reflect on the inspiration behind your designs and how they fit together. 8. Show Off Your Work: Take pictures of your sticky-note mosaic and share it with family and friends. We’d love to see it too—email your creations to contact@yofa.ie!
E09 Feel your Frida
Materials Needed: - Small Canvas Boards or Heavy Paper - Acrylic Paints and Brushes - Coloured Pencils or Markers - Craft Flowers or Paper for Collage - Glue - Mirror or Printed Selfies for Reference - Optional: Fabric Scraps, Beads, Sequins Objective: Create a Frida Kahlo-inspired self-portrait that celebrates your identity, emotions, and surroundings. Use vibrant colours, symbolic elements, and decorative details to make it uniquely yours. Steps: 1. Learn About Frida Kahlo. Research Frida Kahlo’s art and life. Notice how her self-portraits often include bold colours, floral elements, animals, and symbolic imagery. She used her art to explore her emotions, identity, and the things she loved. Look at her famous works like 'Charola de Amapolas' or 'Self-Portrait with Thorn Necklace and Hummingbird'. 2. Think About Your Identity. Reflect on what makes you *you*. What colours, animals, or symbols represent your personality, feelings, or culture? Maybe it’s a favourite flower, a special memory, or something you love about your surroundings. 3. Sketch Your Portrait. Use a mirror or a printed selfie as a reference. Lightly sketch your face and shoulders on the canvas or paper. Add some Frida-inspired details, like flowers in your hair, bold eyebrows, or meaningful objects around you. 4. Add Symbols. Incorporate symbols into your portrait that tell a story about your life or emotions. For example: - A sun or moon for hope and growth; - A pet or favourite animal for companionship; - Flowers or plants to represent nature and resilience; - A flag for your nationality; - Or anything that represents you, your family, your culture or your friends. 5. Bring It to Life with Colour. Use bold, vibrant colours to paint your portrait and background. Don’t be afraid to mix unusual colours or patterns. Frida’s work often blends realism with imagination—let your creativity flow! 6. Collage and Embellish. Add 3D elements like craft flowers, beads, or sequins to your portrait. Use glue to attach these to your artwork for a decorative touch. 7. Give It a Title. Frida’s artworks often had meaningful titles. Think of a name for your self-portrait that reflects its story or how it makes you feel. 8. Share Your Artwork. Show your portrait to friends and family, and talk about the symbols you included. Take a photo and send it to us at contact@yofa.ie—we’d love to see your masterpiece!

E08 Mini Gallery
Materials Needed: - Small Cardboard Boxes (shoe boxes or cereal boxes, with top or one side removed) - A few of the following: * Clay or Playdough (for sculptures) * Paints and Brushes (for paintings) * Found Objects (pinecones, leaves, buttons, beads, paper, fabric scraps, etc.,) * Glue * Markers or Coloured Pencils * Scissors Objective: Make your own mini gallery using boxes as display units. Create different types of art pieces to fill each box, all with the same theme or style. Steps: 1. Look up art in different countries, continents or by different artists to see what theme or style of art you like and want to use for your mini gallery. For example: Japanese art can be minimalist, focusing on nature, influenced by Zen philosophy and natural surroundings. Mexican art often uses bright colours and folk motifs, inspired by indigenous cultures and the country's vibrant festivals. Take time to explore a few specific countries’ art styles through books, websites, or reference images. 2. Pick your own art style or theme. For example, you can pick 'minimalist', 'bold colours' 'Floral patterns', 'kindness', or 'autumn', to give you some ideas. But feel free to pick your very own! 3. Think about what makes your style unique—colours, materials, patterns, subject matter, or symbolism. 4. Plan Your Art: Now that you’ve selected your theme or style, decide how to incorporate elements of your theme and style in different types of art, like a painting, a drawing, found art and sculptural art. 5. Now arrange your boxes with the open sides facing you. You can sit them on top of each other, or side by side. Whatever you prefer. 6. Start to create your art. Pick a different medium for every box. Then start painting, drawing, sculpting, sewing, photographing, etc. to fill your boxes. 7. Work on your display. Arrange your finished art pieces inside the boxes so that the can all be admired from one side 8. Give your mini exhibition a tile and show your friends and family! Make sure to send us a picture too, by emailing it to contact@yofa.ie
E07 Meditative Mandalas
Materials Needed: - Plain Paper or Sketchbook - Pencils or Fine-Tip Markers (variety of colours) - Ruler or Compass (optional for symmetry) - Eraser - Reference Images of Mandalas (optional, for inspiration) Objective: Create a colourful mandala design using pencils or markers. Embrace the meditative nature of the process as you add vibrant patterns, and enjoy the calming experience of symmetry and repetition. Steps: Learn About Mandalas: A mandala is a geometric design that is often used in Tibetan meditation, symbolising wholeness, balance, and the universe. As you create your mandala, focus on the calming process of repetition and symmetry. Choose Your Materials: Decide whether to use pencils for a softer, gradient effect or markers for bright, bold colours. Consider the type of colours you want to use: vibrant, calming, or a balanced mix of both. Start with a Central Point: Begin your mandala by drawing a small circle in the center of your paper. This will serve as the focal point. You can use a compass for perfect symmetry or freehand it for a more personal touch. Alternatively, You can fold your page in half, then open it and fold it in half again the opposite way, unfold it to use the creases as a guide. Draw Concentric Circles: From the center, draw several larger concentric circles. These will be the guides for your patterns. Space them evenly, and feel free to adjust the size based on your design. Add Patterns: Start adding repeating patterns around the circles. Use geometric shapes like petals, triangles, or curves. As you work your way outward, let your creativity flow while keeping the symmetry intact. Colour Your Mandala: Once your design is complete, begin coloring in your patterns. You can use contrasting colours for boldness or gradient shades for a more soothing effect. The key is to embrace the process of creating and enjoy the calming repetition. Reflect and Meditate: As you colour, let your mind focus on the act of creation. Mandalas are known for their meditative nature, so take your time to enjoy the moment, allowing the symmetry and patterns to bring peace and mindfulness. Name Your Mandala: Give your mandala a name that reflects its energy or the emotions it evokes. It could be something related to balance, harmony, or the peaceful process of creation. Show Off Your Work: Once finished, share your mandala with others or display it in your space. If you'd like, take a photo and share it with family and friends to show off your colourful creation. Or send it to contact@yofa.ie with 'Art Adventures' in the subject line and we will add it to the podcast gallery page.

E06 Grounding with Clay
Materials Needed: - Air-Dry Clay - [Optional] Plastic or Wooden Tools - Water and Small Brushes Steps: 1. Prepare the Clay: Take a small ball of clay, about the size of a golf ball. First, just hold it, play with it a little, and feel its texture to get familiar with how it moves in your hands. 2. Form a Ball: Roll the clay gently between their palms until it’s round and smooth. 3. Create the Pinch Pot: Press your thumb into the center of the clay ball, creating a small dent. Be careful not to press too far down. You don't want to go all the way through, but leave a base of clay for your pot. 4. Now gently pinch the clay sides between your thumb and fingers while turning the clay around in a circle. This creates the pot shape. Keep the pinches gentle, pressing too hard may cause the clay to tear, you don't want that. 5. Keep shaping and smoothing until you're happy with the size and thickness of your pot. If your clay starts cracking or feels a little dry, just wet your fingers slightly to moisten the clay. Don't add too much water as this may turn the clay into goop. 6. Add Details: If you like, you can use clay tools, the edge of a plastic fork, or your fingers to make simple patterns around the outside of the pot, like dots, lines, or waves. You can also use a brush with a small amount of water to smooth any rough spots on the clay. 7. Drying and Display: Once finished, let your pinch pot dry overnight. 8. Use acrylic paint to add a painted design to your pot if you wish. If your pot has thick layers of clay, you may need to allow it to dry completely for several days before starting to paint it. As painting with acrylics before your pot has fully dried can cause the paint to peel off.
E05 Cultural Art Exploration
Materials Needed: - Paper or canvas - Pencils, markers, or paint - Reference images or books on art from different countries optional: use the internet for research) - [Optional] Collage materials to represent cultural symbols Steps: Learn About Cultural Influences in Art: Begin by exploring why art styles vary so much across different countries. Geography, climate, materials, religious beliefs, political history, and cultural values all play a role in shaping art. For example: African art often features bold patterns and masks, influenced by tribal traditions and spiritual practices. Japanese art can be minimalist, focusing on nature, influenced by Zen philosophy and natural surroundings. Mexican art often uses bright colours and folk motifs, inspired by indigenous cultures and the country's vibrant festivals. Take time to explore a few specific countries’ art styles through books, websites, or reference images. Pick Three Countries to Represent: Choose three different countries that have distinct art styles. You can pick based on personal interest or select from regions known for their unique art, like: India (rich colours and intricate patterns) France (impressionist and classical influences) China (delicate brushwork and calligraphy) Think about what makes each style unique—colours, materials, patterns, subject matter, or symbolism. Plan Your Art: Now that you’ve selected your countries, decide how to incorporate elements of each country’s art style into one cohesive piece. You could divide your paper or canvas into three sections, each representing a different country, or combine elements from each style into a single artwork. Consider how different countries’ styles could interact. For example, how would traditional African patterns look alongside Japanese calligraphy? Or how could you combine the bold colours of Mexican folk art with the delicate details of Chinese painting? Create Your Artwork: Step 1: Start with the first country. Use markers, paint, or pencils to replicate the distinctive style of that country. You might create patterns, symbols, or use the colour palette traditionally found in their art. Step 2: Move to the second country. Either create a separate section on your canvas or integrate elements of that country’s art into the first. Be bold in combining styles! For example, you could layer the soft pastels of French Impressionism over intricate Indian henna designs. Step 3: Finish with your third country. Continue exploring how the unique art traditions from this country interact with the previous styles, thinking about how art reflects the country’s history, values, and geography. Use Collage for Symbolism (Optional): If you want to add more dimension, you can create a collage using images or materials that represent cultural symbols from the countries you’ve chosen. For instance, you could cut out images of lotus flowers for Chinese art or photographs of historical landmarks for French art. Reflect on the Process: When your artwork is complete, step back and reflect on the differences and similarities between the styles you used. Why do you think art in different countries looks so different? Consider how the culture, history, and environment of each country influenced its art traditions. How does combining these styles in one artwork create something new and exciting? Share and Discuss: Show your artwork to others and discuss what you’ve learned. Talk about how art reflects the identity of a country, and why it's important to understand the cultural context behind artistic traditions.


E04 Nature's Palette(with a twist)
Materials Needed: - Charcoal powder (for black/gray tones) - Berry juice (from blueberries, blackberries, or raspberries for purples, reds, and blues) - Coffee or tea (for brown tones) - Beet juice (for rich red-purples) - Lemon juice (to experiment with changing colours) - Brushes, sponges, or cotton swabs for application - Paper or canvas - Bowls for mixing pigments - [Optional] Natural binder like honey or egg yolk to thicken the pigments Steps: Prepare Your Natural Pigments: Charcoal Powder: Crush charcoal sticks into powder using a mortar and pestle or another blunt object. Berry Juice: Mash berries in a bowl, then strain the juice through a cloth or sieve to remove seeds and pulp. Coffee or Tea: Brew a strong cup of coffee or tea and let it cool. Beet Juice: Juice your own beets or use store-bought beet juice for rich red-purple tones. Lemon Juice: Squeeze fresh lemon juice into a small bowl to use for your color-changing experiments. Test the Natural Pigments: On a scrap piece of paper, try out each pigment. Notice how charcoal powder creates a soft, smudgy effect, while berry juice, beet juice, coffee, and tea act more like watercolors. Experiment with Lemon Juice: Magic Color Change: Lemon juice is acidic and can change the color of certain natural pigments, especially those made from fruits like berries. On a separate piece of paper, paint a section using berry juice (such as blueberry or blackberry). Then, dip a brush or cotton swab in lemon juice and gently paint over the berry juice. Watch the Magic: You’ll notice the color may shift—berry juice might lighten, turn more pink, or even change entirely! The acidity in the lemon juice interacts with the natural pigments, creating new shades and effects. Plan Your Artwork: Decide on the subject or theme of your artwork. You can paint a landscape using natural earthy tones, create an abstract composition that highlights the color shifts, or focus on blending the different pigments. Apply the Pigments: Charcoal Powder: Dust or apply with a sponge or brush for soft shading. You can mix it with water or a binder for more defined lines. Berry and Beet Juices: Use a paintbrush, sponge, or cotton swab to apply these vibrant natural colors. Experiment with layering berry juice over beet juice or coffee for unique effects. Lemon Juice Experiments: Use the lemon juice to alter specific areas of your berry juice or beet juice applications. Try creating patterns by painting shapes with lemon juice on top of berry juice, watching the colors change as they interact. Layer and Blend: Play with layering the pigments. Paint with coffee or tea for warm undertones, then add brighter berry juice or beet juice on top. Dust charcoal powder over wet areas to see how it interacts. Use lemon juice as a special tool to transform parts of your work and create unexpected color shifts. Dry and Seal: Let your artwork dry thoroughly. Natural pigments can fade slightly as they dry, which adds to their organic charm. If you want to preserve your piece, lightly spray a fixative or seal it with a natural wax like beeswax. Reflect on the Process: How did the lemon juice affect your pigments? What surprised you about the color changes? Reflect on how natural pigments connect you to traditional, sustainable art practices. Consider the differences between using synthetic paints versus natural materials and how these organic pigments feel more connected to nature.

E03 Abstract Self-Portrait
Materials Needed: - Paper or canvas - Paint, coloured pencils, markers, or crayons - [Optional] Magazines for collage, glitter, fabric scraps - [Optional] Glue and scissors (if using mixed media) Steps: Reflect on Your Inner Self: Before starting, take a few moments to think about who you are beyond just your appearance. What colours represent your personality? What shapes or symbols feel connected to your emotions, interests, or values? Select Your Materials: Decide which materials you want to use—paint for bold expression, coloured pencils for detailed designs, or maybe a mix of both, along with collage elements. Create Your Abstract Portrait: Begin creating your portrait. Rather than focusing on making it look like you physically, use colours, patterns, and symbols that represent your emotions, dreams, or what makes you unique. You might paint swirls of vibrant colours for energy, or gentle waves for calmness. Add in abstract shapes or items that have personal meaning to you. Add Personal Elements: If you'd like, glue on collage pieces such as images or words from magazines that resonate with who you are or represent your passions and experiences. Reflect: Once finished, step back and look at your portrait. Does it feel like "you"? How does this version of a self-portrait capture aspects of who you are that a typical portrait might not? Reflect on how art can represent identity in more than one way.


E02 Mona Lisa Mystery
Materials Needed: - Paper or canvas - Pencils or charcoal for sketching - Paints or coloured pencils for adding colour - Reference image of the Mona Lisa - [Optional] Collage materials for adding a modern twist Steps: Research the Mona Lisa: Spend a few minutes looking at an image of the Mona Lisa. Notice her subtle smile, the mysterious background, and her relaxed yet poised posture. Think about the theories behind why she has captivated so many people—her expression, the skill of the artist, or the mystery behind her identity. Sketch Your Own Portrait: Start by sketching a simple portrait of someone (it can be yourself, a friend, or a character from your imagination). Focus on making the expression subtle but intriguing, similar to the Mona Lisa’s gentle smile. Add Mystery or Symbolism: Now think about what could make your portrait iconic. Perhaps it’s a slightly raised eyebrow, a smirk, or a mysterious gaze. You can also add elements of mystery or symbolism in the background—something that could get people wondering, just like the soft, distant landscape behind the Mona Lisa. Paint or Colour Your Portrait: Use colours to enhance the mood of your portrait. Soft, muted tones might give it a timeless, classic look, similar to the Mona Lisa. Or, use bright, unexpected colours to give it a modern twist. You can even incorporate collage materials, adding layers of texture or modern symbols to mix classic and contemporary styles. Reflect on Fame: Once you’ve completed your portrait, reflect on what makes it stand out. If you showed it to others, what might intrigue them about it? Why do you think the Mona Lisa has remained so famous over the centuries? Does it have to do with her expression, the artist’s reputation, or the mystery surrounding her?
E01 Found Object Sculpture
Materials Needed: - Household items (e.g., buttons, bottle caps, string, plastic containers, etc.) - Glue or tape - Scissors - A flat surface (e.g., cardboard or a tray) for the base Steps: Collect Objects: Spend a few minutes gathering small objects from around your home that catch your eye. Look for things that have unique shapes, textures, or colours. Visualise: Spread out the objects and think about what they could represent. It could be a story, a feeling, or just an abstract arrangement that you think looks fun. Assemble: Begin arranging the objects on your base. Experiment with how they look together—try stacking, laying flat, or overlapping. Once you're happy with the design, secure the pieces with glue or tape, or take a photo to eternalise your found art in a photograph. Reflect: After completing the sculpture, take a moment to think about how the everyday objects have transformed. What does this creation say about art? Is it in the materials, or in how you’ve used them?
